Thursday, October 20, 2011

Scoop-A-Syllable


Syllabication is a fancy word I learned a long time ago but still have trouble pronouncing. That being said, the night before I was going to teach the concept to my children I had to practice saying the word so that I could, of course, teach my kids to say the word. After saying the word we sat down to business.

Before children are able to learn to break a word into syllables, they must learn to feel the syllables of the word. In our home we internalize syllables by clapping syllables, which is one of our favorite activities (our children walk around the rest of the day clapping syllables). For example, I say the word "chocolate". Then I repeat the word while clapping at each syllable break. Finally, I have the child say and clap with me. I repeat this process until the child (or children if I am teaching or reviewing with more than one) understands clapping syllables. To make the lesson more interesting, therefore producing greater potential for retention, I usually choose a group of words that would interest the child (presidents, gardening, animal names, food choices, etc.). In the case of this blog entry our words were ice cream flavors.
If you are a follower of my blog, you know I like to create games to make learning fun. For our syllable study, I designed a set of twelve ice cream cones each labeled with a flavor of ice cream. I also designed ice cream scoops. For the first version of the game, I had a player chose a cone and together we said the flavor. Then we clapped the syllables while saying the flavor. The child then placed the corresponding number of ice cream scoops on the cone. If the flavor was "vanilla" the child placed three scoops on the cone.

For the second version of the game, we placed the cones face down in the center of our play area. Player one took a cone from the cones in the center. That player said the word and selected the number of scoops to match the syllables verbalized.

Scoop-A-Syllable was a delicious way to learn syllabication. Perhaps the only thing better was a trip to our favorite ice cream venue. The sales person was tickled when one child clapped while she ordered. That's another story for another day.

Friday, October 14, 2011

Chocolate Chip Cookie CH, CH, CH

I am often asked how I teach certain skills. My answers vary according to the topic or skill being taught. Most often teaching a skill involves a game. Some I buy. Some I create.

Lately my children have enjoyed a game I created called Chocolate Chip Cookie CH, CH, CH. Several rounds later, my girls had a pretty good handle on decoding words with CH in the initial position (words starting with CH). Here is a sampling of how the girls (ages 5 and 7) used my Chocolate Chip Cookie (could be pancakes if you'd rather) game.

For the first game we dealt out the CH cookies and put all the "ending" cookies face down in the middle. I drew a card and said the ending. If it was a two-letter ending (-at, -in, -um) I handed it to the younger player. If it was a three-letter or four-letter ending (-arm, -ant, -ess, -eese, -eat, -eap, -est) I handed it to the older player. The player said the ending and then added the CH sound, reading the word.

For the second game we dealt out the CH cookies and again put all the "ending" cookies face down in the middle. Players took turns drawing an "ending" cookie, joining it with a CH, and saying the word.

For our third game we followed the directions above but included the additional requirement of making up a silly sentence with the word. This was especially fun, a great way to end our lesson.

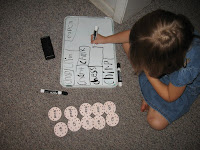
Later, the younger player decided to match the CH cookies with the "ending" cookies and "spell" them on the white board.

Wednesday, October 12, 2011

Dad's Twenty-Year-Old Shirt Becomes Our History Fair Project

Two days before our support group history fair and we needed a history fair project for a younger learner. Sister had a project and she NEEDED one, too!

A Google search landed me on a grand find: the instructions for a Nettie Doll. We read the information we found online, talked about the era in which Nettie Dolls were common, and gathered scraps of fabric we had in the sewing area. We also rounded up some old clothes no longer suitable for wearing, including Dad's twenty-year-old shirt. Nestled on the carpet among a growing pile of 1/2 inch fabric strips we selected our colors. Each girl counted 35 strips of fabric and arranged them on a horizontal pile.


Then they counted 25 shorter matching strips for the arms. We followed the directions and presto...a Nettie Doll.


After making 6 (our niece was visiting) our living room carpet was covered with fabric threads and trimmings, but the end products were priceless. One young learner took an afternoon nap with her Nettie and the others are planning a "Nettie sleepover" with theirs. What fun! We learned something new, completed a project together, and built deeper relationships.

History fair will be extra special this year.


So, just in case a history fair event is in your near future, find some fabric, start cutting, and make some small authentic friends.